Henri Maurice Compression Shirt
Snake's under-suit is a thing of fiction, closest would be a wetsuit, but you are not going to find one that is 1:1 to the game, at least not that I have seen. A compression shirt will work just fine as an alternative. Search for a base layer compression shirt with a turtleneck/mock turtleneck. The mock turtleneck is where your Throat Mic will strap around.
The easiest place to find compression shirts will most likely be a sporting goods store or Amazon. I like using a brand called "Henri Maurice" from Amazon (Pictured above) but I have not seen them produced in black in quite a few years. Some of the ones you will find online are in Asian sizing so make sure you pick your correct size.
Try to find one without a logo or a logo that would not be visible under your fatigues. If it does happen to have a logo, you could remove it: If its a heat sealed logo, you can use acetone/nail polish remover and patiently rub it on the logo over and over until it falls off. If the logo is embroidered, you can use a shaving razor to remove it or color it black. mrgammon (a well known costume designer on Instagram) has a amazing tutorials on removing heat sealed and embroidered logos.
P.S. I also recommend compression underwear as well. They feel great on your John, and Jane Does!
Now, if you are looking to be 100% accurate down to the detail, there is lettering, "Direct Action Suit DPSC-94-C-1872" lettering on the forearm and eyelet holes on the elbows. I've seen some cosplayers add PU leather Sleeves to their undershirt, as seen in Muldoonx9's guide. I did not bother with those details myself.
(I will add Delta screenshots to show the eyelets and lettering in the near future)
M1949 Glove Shells
Price: $20-25
Rothco Leather D3-A Military Gloves
Snake wears M1949 Glove Shells with the thumb, index, and middle finger tips cut off at about the second knuckle, as well as eyelets on the backside. I did not bother adding the eyelets myself.
Rothco Leather D3-A Military Gloves look practically the same. My hands are of average size so I went with size 4.
The following steps are not necessary for modifying the gloves, but I highly recommend following them to preserve the longevity of the stitching when cutting off the fingertips:
- Flip the gloves inside out so the stitching is visible, this is tough to do, you will need tools to push the fingers inside out.
- Mark the gloves with something you can remove (like tailor's chalk) a little under your second knuckles of your fingers and cut the tips off at the markings.
- Re-stitch or glue alongside the seams of the cut fingers so they do not come undone.
- Then, flip them back the right way.
(I will add Delta screenshots to show the eyelets in the near future)
Knee Sleeve
Price: $15-20
Copper Fit Knee Sleeve
I recommend using the Copper Fit knee sleeve, but any black compression knee sleeve will work. I use XL so that it slips on and off my knee more easily. If there is a logo/branding, remove it.
Also, it is very thin and does not have padding, so keep that in mind. Now that I am getting older, sometimes I will also use an actual knee pad under my pant leg, and as VenomousPicklz commented below, it does help your leg look less thin/chicken legged.
Alternatively, like the undersuit sleeves, you could make one out of PU leather and add "Direct Action Suit DPSC-92-T-520" lettering at the top.
(I will add Delta screenshots to show the lettering in the near future)
Jungle Boots
Price: $45-200
Rotcho Jungle Boot (Left), McRae Jungle Boot (Right)
There are two boots I can recommend based on my own personal experience: If you're looking for the most bang for your buck, I recommend Rothco, they are easier to obtain at a good price. However, they are not the best for support.
Now that I am getting older, the Rotcho boots just don't cut it for me anymore, my back was killing me by the end of the convention. Now I use McRae's Tropical Boots (Right Picture), they are bit on the pricier side ($200) but my back has never been more grateful.
Some reviewers say get a size smaller, others say get a size bigger. I wear mostly size 9.5 shoes but I ended up with an 8R. (military boots do not come in half sizes, but do come in wider sizes.)
I HIGHLY RECOMMEND getting aftermarket insoles, Rotcho does not come with any and the insoles that come with McRae are basic. Your lower back and feet will ache if you don't use adequate insoles. Everyone is different, and you will need to do your own research based on your physical needs to find the perfect insoles.
If your boots feel slightly loose even with insoles, I recommend wearing thicker or doubling up on socks. It should make your boots nice and snug.
Bandana and Eyepatch
Bandana Price: About $4 for fabric.
- Commissioned bandana prices may vary.
Eyepatch Price: Prices may vary.
TDOPro Bandana (Left), Fabric from a hobby store (Right)
Ah yes, the bandana, Snake's signature article of clothing. Depending on which concept art/ in-game models/ HD art you want to follow, you should go with either olive drab, dark blue or blueish-grey fabric. Most fabrics at craft stores have a width of about 60 inches which is plenty to tie around your head.
You want to make sure you have enough cloth to cover your brows and forehead. Measure the distance from the bottom of your brow to your hairline, double that measurement, then add about half an inch to an inch, as you'll need that extra half an inch/inch for when you stitch/glue the fabric together.
- Fold the bandana in half longways and stitch/glue the bandana closed.
- Then, flip it inside out so the seams don't show, then stitch/glue the ends shut.
If you're looking for a bandana with the furrow detail and more thickness, TDOPro Cosplay on Instagram makes really nice ones and is currently the one I am using (Photo above). He also makes other leather goods, so lead times may vary depending on his schedule. Message him on Instagram for more details: TDO Pro Cosplay Instagram page
For the eyepatch, you can also contact TDOPro. (I currently am not using one of his patches, but they are high quality!) Etsy is also another great place to find high quality eyepatches.
I do not recommend getting a medical eyepatch from a pharmacy, they're way too big and don't look cool at all.
Individual Load Carrying Equipment
Stabo Harness
Price: Varies


 Handmade Harness by TheRonin (Left), Paratroop1968 (Middle), Hub City Outdoors (Right)
Hands down the most important, but also the most expensive/rarest piece of Snake's getup; the Stabo Harness. A real Stabo Harness will cost you at least $500, if you can even find one in decent condition. The in-game harness is black, however, the real harnesses Special Forces used only came in olive drab.
Paratroop1968 on eBay commissions them from time to time. They are a well established military surplus vendor on eBay, so you could keep a lookout for his listing or message him directly.
Hub City Outdoors LLC carries fantastic reproductions in black for $300 (used to be $250 😞 ). This is what I am currently using for my harness and highly recommend them. They sell out often so keep an eye open for restocks.
Build your own harness
If you'd rather build your harness, I suggest finding a cheap surplus Parachute Harness as they usually have all the buckles needed, plus olive drab webbing if you're okay with not having black webbing.
Alternatively, I provided links below to the correct webbing and hardware you would need to build your harness. They can get pricey, but it comes from a real skydiving/parachute equipment company, which are identical to the vintage buckles from the Vietnam Era. Depending on which version of Snake Eater you want to cosplay, (but also feel free to mix and match!) you will need the following hardware:
Link: Type 8 - Nylon Webbing -
Not accurate but thinner, and easier to work with. My prior harness was made from Type-8, and it would loosen constantly due to the weight of the load carrying equipment. You will likely need to tape above the V-buckles, just like Snake does in the original Snake Eater, this also helps hold up the belt M1956 Individual Equipment Belt. I have created a free 3D printable belt risers and gives the illusion that you taped your harness so it doesn't actually get sticky with tape residue!
MGS3 Original with a taped harness
Buckles
MGS3 Original
MGS3D/MGSV/HD/Pachinko
MGSΔ
Quick Ejector Snap Hook -
Δ only. Really damn expensive, better off finding cheaper secondhand or from surplus harnesses.
Historically Accurate Buckles - (Not in any version of the game, but later iterations of the Harness did replace the Snap Hooks with the friction bar variants for better leg strap adjustments.)
3D Printable Buckles
And for a cheaper alternative/for those in countries where it is harder to obtain the buckles, Nakamura Productions makes STL files for the buckles.
In the near future, I will be making a tutorial video on how to make a Stabo Harness, however I am not a tailor/seamstress, so I am not comfortable commissioning them and will not, but I hope my video will be clear enough for you to make your own or have it commissioned.
M1956 Individual Equipment Belt
Price: $9-50
Snake uses a M1956 Individual Equipment Belt in olive drab with a horizontal weave pattern and brass ball-end buckles. These aren't too hard to come by, but harder in pristine condition, but hey, we're supposed to look like a grizzled soldier right? So a little weathering, and wear and tear only makes us look more the part!
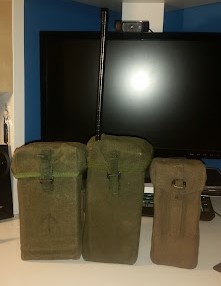
M1956 Universal Small Arms Ammunition Pouch
Price: $10-40 each pouch
1st Pattern (Left) 2nd Pattern (Right)
Snake is equipped with two M1956 Universal Small Arms Ammunition Pouch. I currently use the 2nd pattern as opposed to the 1st pattern. The 2nd pattern works better for storing and removing its content, as opposed to the 1st pattern which was really stiff due to the plastic stiffener in the front wall's lining.
If your pouches have stale odors, place an open box of baking soda in each pouch for about a week or two to help the smell. Plus it'll help reform its box shape. You can also use sturdier cardboard to help reform its shape.
I have created a free experimental 3D printable box that can be inserted in to the ammo pouches to help hold its shape.
1 Quart Canteen and M1956/M1967 Cover
Canteen: $10
Pouch: $20-$30
1 Quart Canteen (Left), M1956 Cover (Middle), M1976 Cover (Right)
The plastic canteen is probably the easiest piece of equipment to obtain. You can get a new one anywhere that sell camping and military surplus.
The M1956 canteen cover is a bit more difficult to find in unissued condition. Most are faded or soiled from real use due to the canvas material, mine is starting to fade from usage. If you do happen to come by one in nice condition, snatch it up, you might not get that opportunity again.
In Delta, Snake uses a nylon cover that is either a M1974, M1975, or M1976, however, we know Snake Eater takes place in 1964, so... TIME PARADOX!
Nylon canteen covers are less prone to water damage, unlike their canvas counterpart.
This is one of the functional features of the cosplay that makes it fulfilling to dress up as Snake. Nothing like filling your canteen with nice cold booze water. Use separate canteen exclusively for booze.
M1956/M1961 Combat Field Pack 'Butt Pack'
Price: $30-100
M1956 Combat Field Pack (Left), M1961 Combat Field Pack (Right)
In the original MGS3, Snake uses a strange butt pack that looks like an amalgamation of the M1941 USMC Combat Field Pack, and the M1956 Combat Field Pack. Just use the M1956 Combat Field Pack to make things easier.
In the artwork for 3D/V/HD/Pachinko and in Δ, Snake uses the M1961 Combat Field Pack which is bigger and more efficient. They are also easier packs to come by.
To maintain its shape, and storage capabilities, you could insert a box with an opening that is roughly the size of the M1956 Pack, this is a bit harder to do in the M1961 pack due to a pouch's smaller opening.
I have created a free experimental 3D printable box that can be inserted in to the buttpacks to help hold its shape.
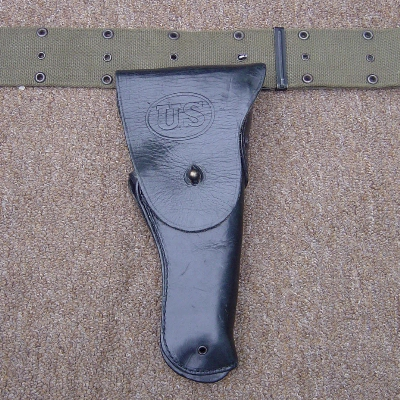
M1 (M1916) Colt .45 Pistol Holster
Price: $28-40
There are plenty of reproduction holsters that are more affordable and in better condition than their original counterparts. I myself use a reproduction holster.
I recommend obtaining the holster a couple weeks before you plan on using it to break it in or use leather conditioner and/or mink oil.
There are left-handed variants so make sure you read the description carefully and get a right-handed version.
AN/PRT-4 Transmitter Radio and Pouch
Price: Varies


 MGS3 Original (Left), MGSΔ (Middle), Real Transmitter with 3D printed Replica (Right)
The transmitter radio Snake uses is a modified AN/PRT-4A, and it is a rare, pricey, and heavy piece of equipment. In the past, I've used it as part of my cosplay, and honestly felt like unnecessary weight. Fortunately, obtaining one has allowed me to design an accurate 3D printable replica that is now available to for you to download for only $5! Link: Radio File
And lastly... the elusive transmitter radio pouch...
The AN/PRT-4A, was designed to be clipped onto the d-rings of the M1956 suspenders, therefore, a pouch does not actually exist, unfortunately. This will be a custom job if you want 100% accuracy.
I custom made a pouch by cannibalizing an old M1945 Combat Field Pack. This was a pain in the ass to make, and I will never make another one again. However, I will upload its dimensions and how to make one at a later point.
Alternative Radio Pouches
If creating a pouch isn't within your skill set, or simply do not want to go through the hassle, below are three alternative (but not accurate) pouches.
All three pouches side by side
Ne0ven0m's guide recommended the Vietnam Era Australian M16 Ammo Pouch, but I found the pouch to be too wide to be a radio pouch, still a great option if this is the only pouch you can obtain.
I've also discovered, and for a while used an extremely rare Vietnam Era Australian L2A1 30 Round Magazine Pouch. The pouch resembles the radio pouch from the concept art, but it is a tad to tall for the real radio.
But, in my own research, I've discovered that the German Uzi pouch looks extremely similar to Snake's radio pouch in terms of height and width. Since my initial suggestion for it back in 2015, it has become the most popular option for cosplayers, including some big name cosplayers. However, the color doesn't match the US pouches exactly, so if you have OCD, this might not be your best option. If you're planning on storing something in the pouch, there are dividers within the pouch that you may need to remove. You can do that by cutting the seams of the dividers located on the front and back exterior of the pouch. Save the dividers, they will be useful for attaching the German Uzi Pouch to the Individual Equipment Belt.
- Inserting AN/PRT-4A into the German Uzi Pouch, and attaching it to Individual Equipment Belt
An AN/PRT-4A Radio will not fit snug in the alternative pouches, but does well enough in the German Uzi Pouch with some manipulation. You may need to cut a hole on the flap of the pouch and slide in the makeshift antenna. Make a "+" shaped incision on the flap of your pouch and slide the antenna through. Thank you to Thjormst from the comments section for showing us its possible, their photos below. In the future, I may design a less accurate but easier to insert AN/PRT-4A.
It has brought to my attention by ELECTRICALfish in the comments section that it is hard to get the pouch onto the belt, this is correct, it is ridiculously difficult but possible. For a less difficult approach, you could use dividers you just unstitched and sandwich them on top of one another - or use any webbing - slide them through the pouch's belt loop, then use ALICE clips on material to hold it on the belt, as shown below
Inserting AN/PRT-4A into the German Uzi Pouch, and the removed dividers used as a workaround to attach belt with ALICE clips
- Getting Creative with Alternative Pouches
Makeshift Antenna and German Uzi pouch and battery pack (Circa 2015)
You could also get creative and fill one of the alternative pouches with something like a power bank (pictured above using a German Uzi Pouch). For a makeshift antenna use anything you could find that's a thin pole, like a flagpole or a thin PVC pipe from a home improvement store. I recommend measuring the length of the pouch, plus the distance from the top of the pouch, to a little above the "X" (cross section) of the STABO harness, and cut the antenna that measurement. Wrap it in electrical tape in a diagonal direction giving it an antenna look, then wrap the tip of the antenna a few times to give it that thicker antenna tip. Like the ammo pouches, use cardboard to keep its shape.
Alternative/Reproduction Sets
Price: Varies
Recently, I have seen some amazing looking budget friendly reproduction pouches online such as eBay, Amazon, AliExpress,
A good source of reproduction pouches that have been vouched for by other Snake cosplayers, especially in the European scene, come from Sofmilitary.co.uk, and from what I have seen, they look great! This may be the best route if you want to do Reproduction pouches instead. US cosplayers may be subject to tariffs, unfortunately, but may be worth checking out.
Weapons and Gadgets
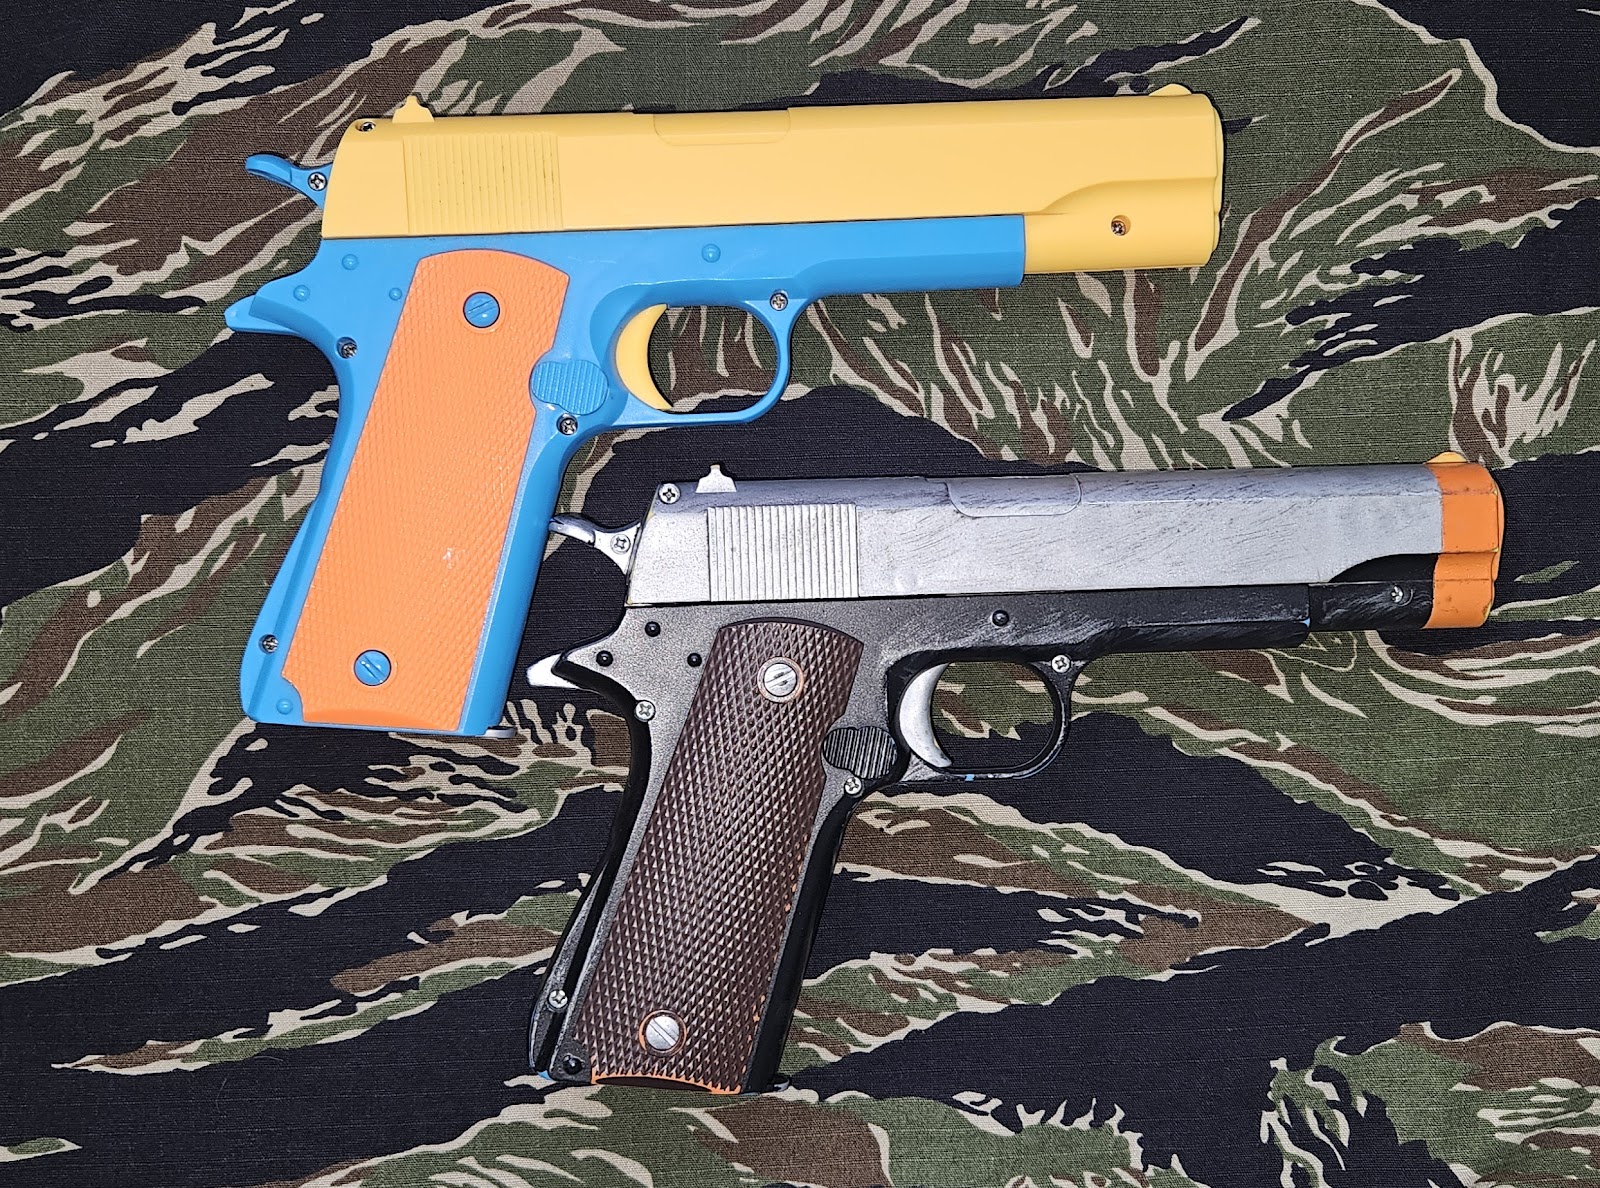
Colt M1911 and MK22 Hush Puppy
Price: $7-25
Venn Models Colt M1911 (Left), and MK22 Hush Puppy (Right)
If you are looking for high quality 1:1 gun props, Venn Models makes some really great 3D printed 1911s and other game/movie props for purchase (Pictured Above): Venn Models MGS Props
For 3D printable files, Nakamura Productions also makes great downloadable STLs for the 1911 and other props: Nakamura Productions' Files
Toy M1911
Alternatively, if you want something a bit more budget friendly, pictured above is a toy version of M1911 that you can get on AliExpress, Amazon, etc. This is the most bang for your buck for an easily obtainable replica. You may want to remove the firing mechanism depending on the convention's prop policies.
CQC Knife and Sheath
Price Total: $2.50 for the file
CQC Knife - MGS3 Original (Left), MGSΔ (Right),
Like a lot of his equipment, Snake's CQC knife doesn't actually exist either. It looks like a modified Strider knife.
After hours and hours of research I designed what I feel is a game accurate replica. You can download the print file from my Cults3D page for just $2.50! The downloads include both the Original knife from MGS3 and the new version from Delta. I've also linked a paracord wrapping tutorial on how to wrap my CQC knife. Link: Paracord Wrapping Tutorial
Because the CQC knife does not actually exist, an accurate sheath does not exist either.
This will be a custom job if you want 100% accuracy.
The 6-inch fixed blade sheath by Marble Knives was the closest I was able to find for accuracy, but unfortunately have not been able to find it for some time now. You can use an alternative 6-inch fixed blade sheath.
I use Velcro to attach the knife sheath to the harness: I used stick on Velcro on the sheath and stitch on Velcro on the harness.
You can also use a stick-on clip (Amazon link above) on the backside of the sheath and simply slide the sheath onto the harness. Link: Stick on clip
Survival Knife and Sheath
Price: $20-50
Survival Knife
Marble's Jet Pilot Survival Knife and Sheath (Left), Tan Boot Blousers (Right)
The survival knife in the game looks like a modified USAF Jet Camillus/Pilot Survival Knife.
Like the CQC Knife, I've also created a 3D printable replica of the Survival Knife!
You can download the print file from my Cults3D page for just $2.50! Link: Survival Knife File
Tennessee Custom Knives and Leather on eBay sells sheaths for the Survival knife, which looks to be a great alternative, I have not purchased one myself. Link: Camillus/Pilot Knife Sheath
A cheaper/more obtainable sheath would be a Ka-Bar leather sheath, it's not accurate but it gets the job done. Whatever sheath you end up going with, get a 6 inch sheath.
In the original game, Snake had his sheath attached to his leg with duct tape, if you do this, you will eventually rip up the leather every time you take off the tape, and make your pant leg sticky, so I do not suggest this. Instead, I use two tan/khaki 2-inch wide elastic boot blousers from the brand Sayre to secure the sheath to my leg. I know that is not their actual function, and it will depend on the thickness of your leg on how tight they'll be, but but they work great! Alternatively, you could create your own adjustable straps, Snake uses straps in Delta as opposed to tape. Link: Tan Boot Blousers
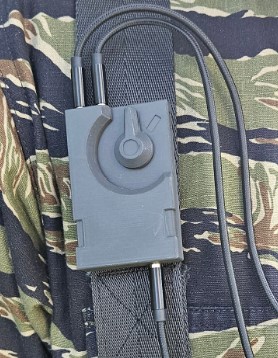
Vox/PTT Switchbox
Price: $2.50 for the file
Like the CQC knife, this particular Vox/PTT Switchbox is also a thing of fiction. You can download the print file I designed for just $2.50! Link: Vox/PTT Switchbox File
Like the CQC knife sheath, you'll need to use velcro on the backside of the Switchbox and velcro on the harness as well.
Throat Mic and Earbud
Price: $2.50 for the file
The Throat Mic is one of the more fun pieces of the cosplay, as it coincides with the Vox/PTT and ANPRT-4A Radio bringing out cool look of Snake's comms system! Link: Throat Mic and Earbud
You will need 3/4 inch (20mm) webbing to clip around your neck. Plenty of good kits that don't require sewing on Amazon. As well as a generic/replacement earbud tip for the earbud. Alternatively you could just use whatever earbud you like, you don't have to use the one included with my throat mic.
The throat mic prints flat, and unless you're printing in flexible material such as TPU, etc., you will need to thermo-bend it to a curved shape to fit around your neck.
*** Please be cautious and do not place hot plastic against your skin! ***
You can connect the Vox/PTT Switchbox to the Throat Mic, Earbud and AN/PRT-4A using 3.5mm aux cables. Depending on your height/size, you'll need to use about 1.5 to a 2 foot long aux cable to connect the switchbox to the throat mic and earbud each, and probably 2 to 2.5 foot long aux cable, again depending on your height/size, from the switchbox to the radio.
How to put on the cosplay
I will update this section in the near future on how to properly wear the equipment.
Optional Add-ons/Accessories
Cardboard Box
Price: IDK... Free?
This is self explanatory, lol.
Cigar
Price: $?
Snake smokes Cuban cigars, but any cheap cigar from a gas station or convenience store probably works.
Calorie Mate
Price: $6 individual - $60 for 20 pack
These are a fun snack to have. You can buy them from Japanese Taste for like $60 + Shipping and other fees. Link: JapaneseTaste.com
I've tried them all.
Cheese: Tastes like blue cheese.
Chocolate: Tastes like a spoonful of coco powder.
Fruit: Tastes like stale lemon cakes.
Maple: Tastes like pancakes.
Plain (Discontinued): Tasted like a combo of potatoes and apples.
Vanilla: Tastes like a vanilla cookie.
My favorites were Maple and Vanilla.
As a bonus, you can keep the Calorie Mate boxes as props. Also, if you're using the 1956 Butt Pack, you can cut an opening off the top of the giant Calorie Mate box and place it inside the butt pack to keep its square shape!
Blue Eye Contacts
Price: $25-50
I've experimented with them, they're definitely a fun add on, but not necessary, I'm not used to contacts (20/20 vision) so my eyes got irritated by the end of the day.
Mullet Wig
You don't necessarily need to add a wig to your cosplay. I've tried the Jett wig from Arda years ago when I first started cosplaying Snake, I did not like it. If you can grow out a mullet, fuck yeah! Do it!
Face Paint
I don't bother with it.
Conclusion
Well, fellow Fox Unit, that just about wraps up the cosplay guide for Snake. I hope it was enjoyable, and easy to follow. If you have any questions, recommendations, or concerns, comment below, email me at aceofsnakescosplay@gmail.com, or message me on Instagram/Discord! If you found this blog helpful, please consider purchasing my 3D files! I like to keep this guide ad-free, and its like buying me a shot of tequila coffee, but you also benefit from it!
If you don't have the capability to print them yourself, there is a printing service called MakeXYZ, that can locate local 3D print vendors near you. Link: 3D Printing Service You can also message me on Instagram, and/or Discord, and we can arrange something. (I will only ship to the Lower 48 States, sorry for the inconvenience.)
If you would like your cosplay to be featured reach out to me via email or message me on Instagram, Discord! I would love to see the cosplays I've helped create!
IG: scipper54
IG: the.greek.scoutrooper
Handle: Thorjmst
IG: waffeman
See you at the cons!
- Ace of Snakes


.jpg)
Circa 2022 - Present
Circa 2015


.jpg)


